Making my Choices
How to choose what to do?
What do I want from a marine aquarium?
How much can I afford?
How much time have I got?
Where am I going to put my a tank?
These are just a few of the things to consider when setting up your first marine aquarium. Nice little article worth reading before you start
What do I want from a marine aquarium?
How much can I afford?
How much time have I got?
Where am I going to put my a tank?
These are just a few of the things to consider when setting up your first marine aquarium. Nice little article worth reading before you start
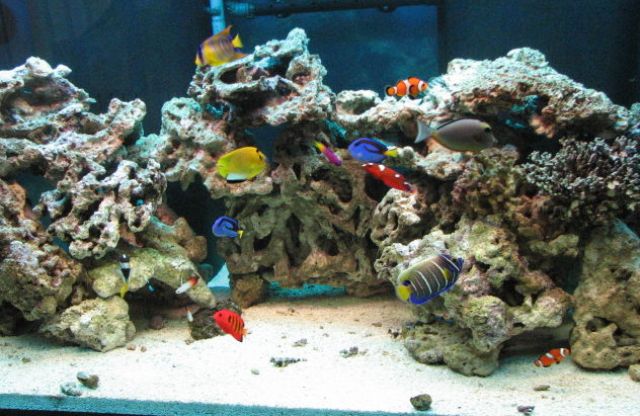
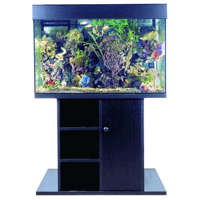
What kind of tank?I needed to consider what type of aquarium I wanted to keep. A fish only aquarium with a few feature fish, something similar with live rock rather then inert rock or artificial rock or corals or a full blown reef. A fish only, although spectacular was too much like my freshwater aquariums so it had to be a full reef setup.
|
|
My full reef aquarium with live rock and corals
|
How big a tank?

This is a really complex question. Lots of things to think about. My first thought was the bigger the better. More water in a freshwater aquarium or pond generally means greater stability and easier to keep. This is not necessarily the case with marines. Another factor here was cost and also where it would go in the house.
As the tank gets bigger you have to consider weight. 150 litres of water weighs 150 kgs plus rock, cabinet and equipment so this has to be considered.
A bigger tank would give more scope for the types and variety of animals that could be kept.
I looked at where I could put a new tank and decided on a space. Reckoned a 3 foot or 1 metre long tank would be good. When thinking about possible aquascaping I knew that water foreshortens the view and so a tank as big from back to front as possible would be best. A depth of about 24" or 60cms off the wall would not be too intrusive, so a tank of around 20" or 50 cms would be fine.
I had also seen a number of reef tanks and looked at a lot of pictures on forums and reckoned height would be benificial. Two issues here, light penetration and arm penetration! Light needs to be effective to the bottom and I need to be able to reach the base of the aquarium... 24" or 60 cms would be fine.
How much water? Roughly 62 gallons or approximatley 280 litres.
Fortunately the joists were running the correct way so no problem with weight on the floor.
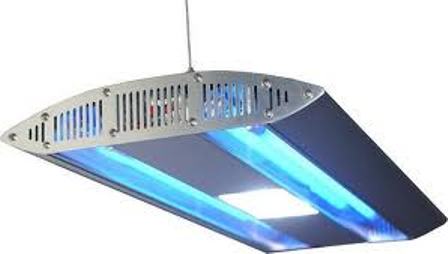
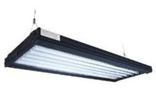
What kind of lighting?Two traditional types of lighting were in use at the time. Metal halide lights or various tube lighting.
Metal halide provides the strongest light and seemed to be the recommended choice for most serious coral keepers. Since 2010 There has been a rapid improvement in LED lights and these now offer an excellent solution. |
|
|
|
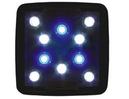
Various tube lights, particularly modern T5 lighting was also widely used and could give different types of lighting effects. I won't go into the technicalities of lighting here but did need to consider cost of purchasing as well as replacement bulbs and running costs. I was also concerned about the amount of light spilling out into the room from a luminaire suspended above the aquarium. As a result of this I also looked at the newer types of LED lights, particularly the TMC tiles. Although initial purchase price was relatively high, running costs were much lower and a 5 year guarantee for the light was also appealing. The fact that the tiles give off very little heat in comparison to other lights meant that they could be mounted inside the lid or hood of a cabinet, therefore no light spillage. At the time of setting up these lights were very new and had mixed reviews. (TMC Aquaray article)
I decided to take the plunge and buy two Aquabeam 1000HD Reef White LED tiles.
Since setting up my tank massive advances in LED lights have taken place. Varied spectrum, programmable lights and many manufacturers have totally changed the way aquarists can grow the corals and light their aquariums. I am still using the Aquabeam tiles, but newer versions as I am limited with having a boxed in lid. Newer lights can give off more heat and are not suitable for my set up.
Aquarium LED lighting for the mini reef Claire McBirney 2015
|
Types of AquariumOk, I had decided on the approximate dimensions of the aquarium but what to get?
I had been switched on to the idea of marines by seeing an Aquamedic Percula 90 setup in a local shop so this was my starting place. It is a 'plug and play' type with everything integrated into one package. I had also seen other 'plug and play' types as well as some with greater flexibility. I decided on a setup with greater flexibility in a wooden type cabinet. |

|
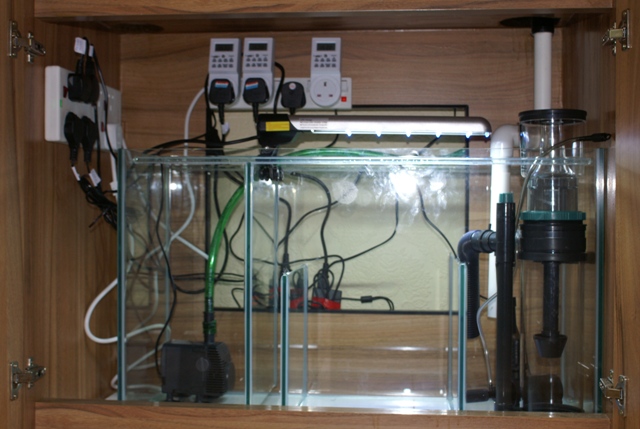
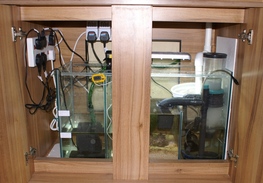
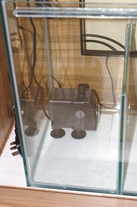
To sump or not to sump?After doing a lot of reading I thought there were a lot of advantages to going with a sump.
To begin with additional volume of water as well as somewhere to put equipment. I decided on a three section sump. One for a skimmer and one for the return pump with a centre section for a Deep Sand Bed (DSB) On reflection 9 years later to sump was probably the best decision I made. |
|
|
As can be seen the cabinet contains all of the electrics plus a sump with DSB, some small pieces of live rock and algae to help with filtration.
The sump has been useful to pop the odd hitchiker into and is excellent for drip acclimatising new livestock.
Once the decision had been made to have a sump I had to find a supplier of a cabinet, aquarium and sump. I wanted to buy the other equipment separately. See Equipment List
The sump has been useful to pop the odd hitchiker into and is excellent for drip acclimatising new livestock.
Once the decision had been made to have a sump I had to find a supplier of a cabinet, aquarium and sump. I wanted to buy the other equipment separately. See Equipment List
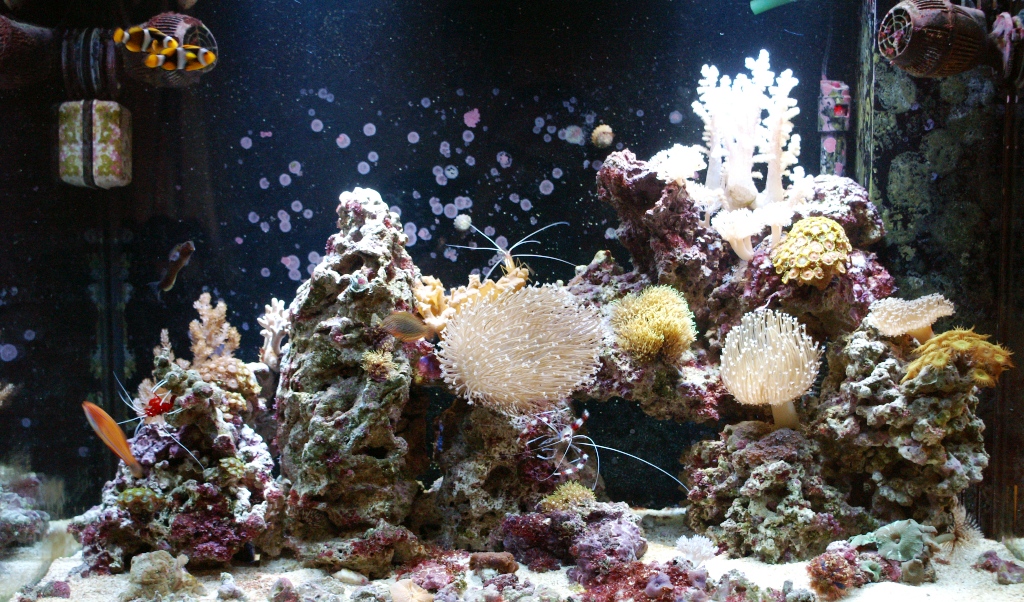
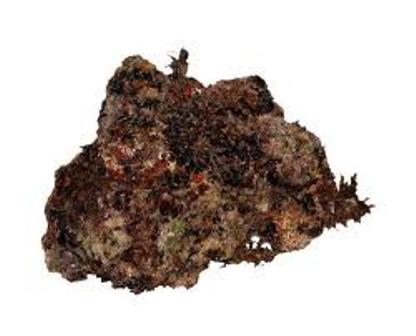
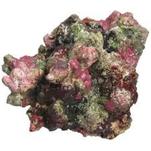
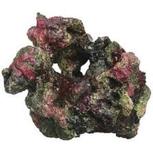
Live rockI had made the decision to use a 'natural filtration' system using live rock, a DSB and algae in the refugium. I would also use a skimmer. So the next choice was live rock , cured or uncured?
Cured was more expensive but I decided this was the best choice for me. |
|
|
|
Live rock comes in a variety of shapes and sizes from different locations, Fiji, the Philipines, tonga etc. I looked around my LFS and didn't really find what I wanted. I also looked at a number of internet suppliers and saw the great variety in type, quality and price. After deciding I needed 30kg initially price was an obvious consideration.
When it came time to purchase my rock I had the tank set up with salt water in and had an idea of the kind of aquascaping I wanted. By this time I had also thought of the kinds of fish and invertebrates I might like. Once again I visited LFS and didn't see the sizes and quality of rock I wanted. Eventually I took the plunge and contacted one of the internet suppliers. I had a long converstion about what I wanted and was assured they would do their best to send me the shapes and sizes I was asking for. Two days later a couple of boxes arrived. It was like Christmas, just a bit more soggy! I was really pleased with the suppliers choice of sizes and shapes as well as quality and price. Many thanks to the folks at Live Rock UK I have since added smaller select pieces from LFS.
When it came time to purchase my rock I had the tank set up with salt water in and had an idea of the kind of aquascaping I wanted. By this time I had also thought of the kinds of fish and invertebrates I might like. Once again I visited LFS and didn't see the sizes and quality of rock I wanted. Eventually I took the plunge and contacted one of the internet suppliers. I had a long converstion about what I wanted and was assured they would do their best to send me the shapes and sizes I was asking for. Two days later a couple of boxes arrived. It was like Christmas, just a bit more soggy! I was really pleased with the suppliers choice of sizes and shapes as well as quality and price. Many thanks to the folks at Live Rock UK I have since added smaller select pieces from LFS.
|
Other EquipmentThe decisions here involved what type or make or size rather than to have or not to have.
I had already decided to have a skimmer so like everyone will need to do, looked at what type and what size. The same decisions made with the return pump and two powerheads to supply water movement and circulation. I had decided to go for between 35 and 40 times the volume of the tank per hour. These decisions will be personal and based on factors of cost, size and taste I suppose. I had to make sure things like the skimmer would fit into the space in the sump. One big consideration was the setting up of the electrics. I wanted digital timers for the lights so that I could seperate the blue and white LEDs in the tiles and could set up for reverse photosynthesis with the light in the sump. Some time after initial setting up I decided to add a Phosban reactor to help keep phosphates down. I had made sure there was space for one in the sump. |
